CariDotMy

 Forgot password?
 Register

ADVERTISEMENT

Author: Who

Photoshop Tutorial

[Copy link]
Post time 11-9-2007 03:53 PM | Show all posts

Reply #260 0001's post

ok akan di cuba..tq
tp kan dalam majalah kan..nampak licin betul..walaupun ada jerawat,guna teknik yg sama gak ke?
Reply

Use magic Report


ADVERTISEMENT


Post time 11-9-2007 07:38 PM | Show all posts

Reply #261 reone's post

ye, guna Healing Brush tool juga.
Reply

Use magic Report

Post time 11-9-2007 09:26 PM | Show all posts

Reply #261 reone's post

Selain healing brush tool, clone tool pun boleh.... tapi itu ko kena accurate.
Reply

Use magic Report

Post time 12-9-2007 12:03 PM | Show all posts

Reply #259 reone's post

boleh guna healing tool atau clone tool..
boleh jugak try guna skintune plugin
http://www.phototune.com/skintune.html

atau boleh try tutorial ini:
http://ps.herjern.com/2007/08/21/fast-and-great-photo-retouch/
http://graphic-design.com/Photoshop/glamour.html

Rate

1

View Rating Log

Reply

Use magic Report

Post time 17-9-2007 11:02 AM | Show all posts
hehe..
nak tanya camna nak buat pelekat-pelekat itu? part tajam2 tu camna ek nak wat..
aku try pakai freeform pen tool..tapi macm tak kemas jer..


[ Last edited by  wau at 17-9-2007 11:09 AM ]
Reply

Use magic Report

Post time 17-9-2007 02:29 PM | Show all posts
Originally posted by 0001 at 12-4-2007 02:09 PM
Nampak cam dia guna pencil tool... 1 pixel pastu click satu2.


boleh guna brush
Reply

Use magic Report

Follow Us
Post time 18-9-2007 11:26 AM | Show all posts

Reply #265 wau's post

ko try carik gambar plaster macam t kat internet..
pastu ko cuba buat brush daripada gambar tu
Reply

Use magic Report

Post time 18-9-2007 12:50 PM | Show all posts

Reply #267 aziz79's post

owh..huhu ok ok..aku ade psd file gamba tuh..camne nk save jd brush ek?
Reply

Use magic Report


ADVERTISEMENT


Post time 20-9-2007 09:27 AM | Show all posts

Reply #268 wau's post

aiseh.. lain kali gunaler abang google
http://www.tutorialized.com/tutorials/Photoshop/Brushes/1
Reply

Use magic Report

Post time 20-9-2007 10:03 AM | Show all posts
Originally posted by wau at 17-9-2007 11:02 AM
hehe..
nak tanya camna nak buat pelekat-pelekat itu? part tajam2 tu camna ek nak wat..
aku try pakai freeform pen tool..tapi macm tak kemas jer..

http://img206.imageshack.us/img206/1916/scbp ...

Sorry, image yang ko letak ni tak tertampanglah... so aku tak berapa pasti apa maksud ko... tapi kalau nak buat macam selofen tape tu, aku prefer guna POLYGONAL LASSO TOOL and buat camni:
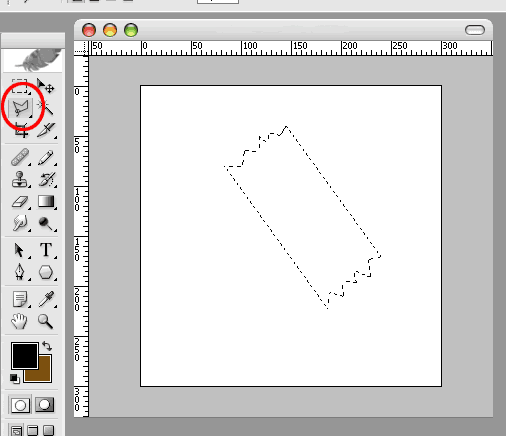


Pastu ko FILL dalam selection tu warna putih and bagi maybe 10-20% transparency.

Kalau nak added effect, STROKE selection tu kat CENTER and bagi 1 pixel wide... kasi maybe 40-50% transparency.
Reply

Use magic Report

Post time 20-9-2007 03:24 PM | Show all posts
camne nak buat cam ni..
Reply

Use magic Report

Post time 20-9-2007 08:20 PM | Show all posts

Reply #271 a.ceCCo's post

Camna nak buat camtu?

1. Amik drugs tiap2 hari.
2. Sebulan sekali, amik gambar diri sendiri.
3. lepas setahun, kumpul gambar2 tu, then ikut steps aku kat post #258.

Reply

Use magic Report

Post time 20-9-2007 10:01 PM | Show all posts

Reply #272 0001's post

ekekeke
Reply

Use magic Report

Post time 20-9-2007 11:28 PM | Show all posts

Reply #269 aziz79's post

ahhaa..lupe lak kat abg gugel itew..teng u
Reply

Use magic Report

Post time 20-9-2007 11:29 PM | Show all posts

Reply #270 0001's post

wah mekaseh nomboq...aku tryyyy
Reply

Use magic Report

Post time 22-9-2007 11:49 PM | Show all posts
ok...thanks
Reply

Use magic Report


ADVERTISEMENT


Post time 30-9-2007 01:52 PM | Show all posts

Camna nak design cover kad jemputan kawin

Ni tutorial camna nak buat cover kad jemputan kawen:

1. Mula2 decide size card tu. Untuk tutorial ni, pilih 4" x 6".
2. Buka NEW FILE, setkan size (iaitu 4" x 6"), setkan RESOLUTION ke 300 DPI dan BACKGROUND warna putih.


(Sekiranya ada background lain, boleh paste saja di new layer sekarang. Untuk tutorial ini, kita akan buat warna background sendiri dan import vector image dari Illustrator.)

3. Sekarang buat LAYER baru untuk buat background effect. Kemudian pilih nak buat gradient dari warna putih di tengah ke beige kat ujung. Mula-mula pilih warna putih untuk FOREGROUND COLOR dan warna beige untuk BACKGROUND COLOR (#1). Pilih GRADIENT TOOL (#2) dan pilih RADIAL FILL (#3). Untuk fill, click di tengah-tengah image dan drag ke ujung.


4. Sekarang import image dari Illustrator dan paste as SMART OBJECT ke image di atas. SMART OBJECT dipilih adalah sebab image tersebut lebih tinggi atau lebar, Photoshop akan resize image tersebut supaya muat ketiingiannya atau kelebarannya.
5. Selepas PASTE, image tersebut diRESIZE untuk kecilkannya sedikit. (Menu- EDIT > TRANSFORM > SCALE). Pilih 95% untuk HEIGHT dan WIDTH. Kemudian double-click di image tersebut untuk setkan resize.


6. Letakkan text. Font EDWARDIAN SCRIPT dan MYRIAD PRO dipilih untuk tutorial ini. Pilihlah font yang mana anda suka. Ni website untuk dapatkan fonts free: dafont.com


7. Save file tersebut as PSD ke dalam CD/thumbdrive dan hantarlah ke kedai print.

Sila click sini untuk download tutorial ni dalam versi PDF.

Sila click sini untuk download Illustrator files yang boleh digunakan bersama tutorial di atas.

[ Last edited by  0001 at 2-10-2007 10:10 PM ]
Reply

Use magic Report

Post time 6-10-2007 01:43 AM | Show all posts
ade ak tutorial nk make up muka org??
Reply

Use magic Report

Post time 7-10-2007 09:34 PM | Show all posts
Kat sini blum ada... cuba ko buat search kat google... aku rasa mesti ada. Good luck.
Reply

Use magic Report

Post time 7-10-2007 09:40 PM | Show all posts
tp aku xtau nk search ape...
Reply

Use magic Report

You have to log in before you can reply Login | Register

Points Rules


ADVERTISEMENT


ADVERTISEMENT


ADVERTISEMENT
Follow Us

ADVERTISEMENT


Mobile|Archiver|Mobile*default|About Us|CariDotMy

31-12-2024 06:09 AM GMT+8 , Processed in 0.103863 second(s), 33 queries , Gzip On, Redis On.

Powered by Discuz! X3.4

Copyright © 2001-2021, Tencent Cloud.

Quick Reply To Top Return to the list